
How to make Thermophilic Compost
- Apr 10
- 6 min read
Updated: Apr 11
There are at least 3 methods that produce safe, biologically complete compost: Thermal (hot) composting, vermicomposting, and Johnson-Su (aged static pile) composting. Each method is kept aerobic (exposed to oxygen), which deters the growth of anaerobic pathogens. Thermal composting has the added benefit of heat to kill pests (weed seeds) and pathogens, and is therefore a great starting point for making compost to be used as a biological inoculum, such as compost teas and extracts.


While Dr. Elaine Ingham has developed an excellent protocol for making a very good thermal aerobic compost, it can be a little bit too intense for a new, home-gardener type of composter.
Here's a simple guide to making your own high quality thermophilic compost, that incorporates some key principles of Dr. Elaine's methods: biodiverse, clean feedstock, balanced C:N ratios for a ~15 day heating cycle, moisture management and oxygenation.
Plan ahead! The thermal stage of composting can produce a lot of heat (55 - 76 degrees C internal core temp!). You will need to aerate your pile every few days, until the pile starts to cool down to ambient temperature. Set aside 1 day to prepare your feedstocks (input materials) and build the pile, and then 15 days to monitor and turn your pile.
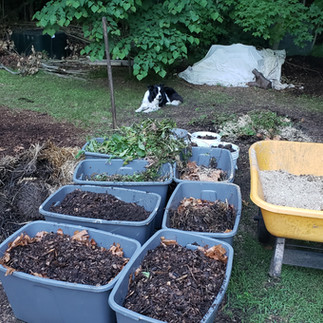
Gather your feedstock.
In order for a pile to reach thermal composting temperatures (>55C or 131F), you will need just over 1 yard worth of material. Collect a mixture of:
10% "High N" - C:N ratio below 30:1, usually manures, legumes, seeds, and grains. This is the "party food" that bacteria go crazy for, which results in the hot stage of composting that is necessary to kick start decomposition and kill seeds, weeds, and pathogens. Depending on how much nitrogen is in the material (usually requires an educated guess), you'll want to this material to make up a total of 7 - 15% of a pile.
If I don't have fresh beer grains as my "high N", I like to use pre-soaked alfalfa pellets from a feed store. They are relatively sterile and do not contain any human pathogens that could be found in manures. Freshly spent beer mash from a brewery is a high N too - talk to your local brewery and see if you can get a few buckets and create your pile as soon as you can get the grains, as they get smelly - fast!
30% "Greens" - C:N around ~30:1, this material sustains the thermal stage through 3 turns over the course of 15 days. Should be fresh, or dried when fresh and rehydrated. Includes grass clippings, hay, weed trimmings, vegetable scraps, and manure that has been exposed to weather for a few months. Aim to make greens ~ 30% of biomass.
If using vegetable wastes, avoid using too much citrus or onions, as it can create acidic conditions and attract pests. Similarly, do not use oily foods, cooked foods, meats, or dairy, as these can also attract pests.
60% "Browns" - the high C material (>100) that continues to decompose over the next year, feeding all life that exists in the pile but especially fungi. Can include woodchips, leaves, cardboard, dried plant stalks. This makes up 50-60% of the biomass in a thermal aerobic pile.
I highly recommend collecting leaf bags in the fall and storing them in a dry place until they are needed. If using woodchips - use aged woodchips, preferably from hardwood as softwood contains antimicrobial properties - but time and composting will break everything down.
Assemble the pile
Presoak or dry all starting materials so they are evenly moist, around 50%. Most vegetable scraps and fresh yard trimmings / grass clippings are already at 50% moisture. Aged woodchips are more porous than fresh woodchips and will soak up water more easily - if using fresh woodchips, soak for several hours. Finally, if using spent beer grains that had been dried down for storage, give them a quick (2hr) soak.
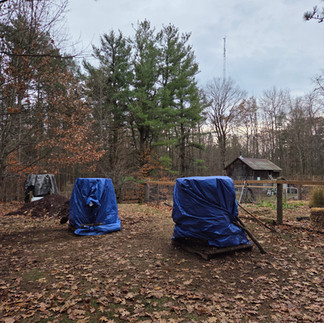
Prepare a composting "stage" - a space large enough to move around and store the compost, ideally in the shade. You can use a store-bought dalek bin like the FreeGarden Compost Bin, make your own 1m*1m cylinder out of a firm hardware cloth (eg. this 2"*4" 14 gauge welded wire fence), or make a pile in a big open heap. Whichever method you use, you'll want to aim to have about 1 yard of material, so anticipate a 1m*1m containment space.
Using a pitchfork and proper lifting/turning posture, thoroually mix all starting materials - no lasagna style here! - think homogenous mixture.
Sprinkle with water to make sure the pile is ~50% moisture.
Turning during the thermal stage
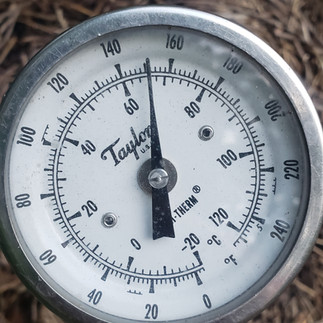
This is the part that I will simplify the most, since most people do not have access to a 12+" temperature probe. If you do~ check internal temperatures of the compost pile at the center of the pile at least once a day. If you do not have a temperature probe, do your best to guess based off of these guidelines:
Day 0: Start. The day you assembled the pile. Start "Time 0" when the pile is built.
Day 1,2: Monitor. In general, it takes a compost pile 2-3 days to heat up to 55C for the first heating cycle.
Day 3, 4: Monitor. The pile needs to stay above 55C for approximately 3 days. However, if you anticipate your pile is too hot (>70C) you can turn in 1-2 days.
Day 5: Turn. Aim to move the cooler, exterior portions of the compost pile in to the middle, and the middle portions towards the edges - every time you turn. Also perform a moisture check (see below) and shower with water if needed.
Day 6, 7, 8, 9: Monitor. after the first turn, it takes about 12hrs for a pile to return to thermal temperatures (>55C), and then another 2-3 days held at this temperature.
Day 10: Turn.
Day 11, 12, 13, 14: Monitor
Day 15: Turn.
Congratulations! You have now turned the pile 3 times and all weedseeds should be cooked and pathogens killed.
Week 3 - 4: If the pile continues to heat up to the point of steaming heavily (>55C), you will have to continue turning every few days until the pile begins to cool.
Moisture management.
During the composting process (~2-3weeks), make sure the pile moisture is 40-50%. You can tell when a pile is moist enough if you grab a fistfull and give it a firm squeeze. You should see 1-2 drops drip down and hear a squishy sound. It can take several days for materials to decompose enough to get a good grip. If in doubt, give the pile a light misting.
If it is going to rain, cover your pile. A saturated pile (>50% moisture) will start to smell, creating anaerobic pockets in the center and potentially breed pathogens.


Storage
Your compost is safe to use as soon as the compost pile returns to ambient (air) temperature. This can happen as quickly as 3 weeks. However, the compost will still be very chunky and not attractive as a top dressing (if this matters to you).
Store your pile covered but with exposure to air. Maintain moisture at around 30%. Use within 1.5 - 2 years.
BONUS: how to use your compost as a biological inoculant
Notes: the microbial community in the compost changes over time.
In the first few weeks of thermal composting, bacteria are reproducing rapidly, causing the temperature spikes after each turn. A premature compost is therefore a bacterial-dominant compost. Since most soils are bacterial dominant, it is best to wait a few months until the soil food web becomes more complex.
As the pile cools and cures (3 weeks to 3 months), protozoa begin to boom. Protozoa prefer to feed off the medium-N green materials in the compost. This is the best time to make a protozoan infusion, if you are looking to create a liquid bioamendment.
From 3 months to approximately 2 years, fungal numbers slowly increase, as they breakdown the cellulosic and lignin-based fibers in the woody brown materials. Since most soils are lacking in fungi, this type of compost can be extremely valuable to vineyards, orchards, and reforestation practices. It is best to use this compost directly, or to make a compost extract with added mycorrhizal fungi for applications to root zones of perennials, shrubs, vines and trees.
In southern Ontario, with our climate extremes and freezing winters, I have found my composts reached peak biodiversity (in terms of all microbial functional groups present in high abundance) around 4 - 8 months. The best microbial counts in composts (and soil) are usually in spring and fall, as the climate is most conducive to their growth (lower temperatures and adequate moisture levels). Therefore, it is best to make and apply a liquid biological amendment from your compost in spring, fall, or just before a rainfall. Always apply with lots of water, and feel free to add some organic fertilizers that act as microbial foods, like seaweed powder or humic acid powder, to help your microbes establish.
See my blog post "How to make Compost Extract" or "How to make Compost Tea" for details on how to make your preferred liquid biological amendment.
Comments